In today’s blog post, we are going to share one of the most popular garden shed plans from Ryan Henderson’s My Shed Plans guide.
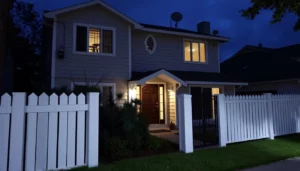
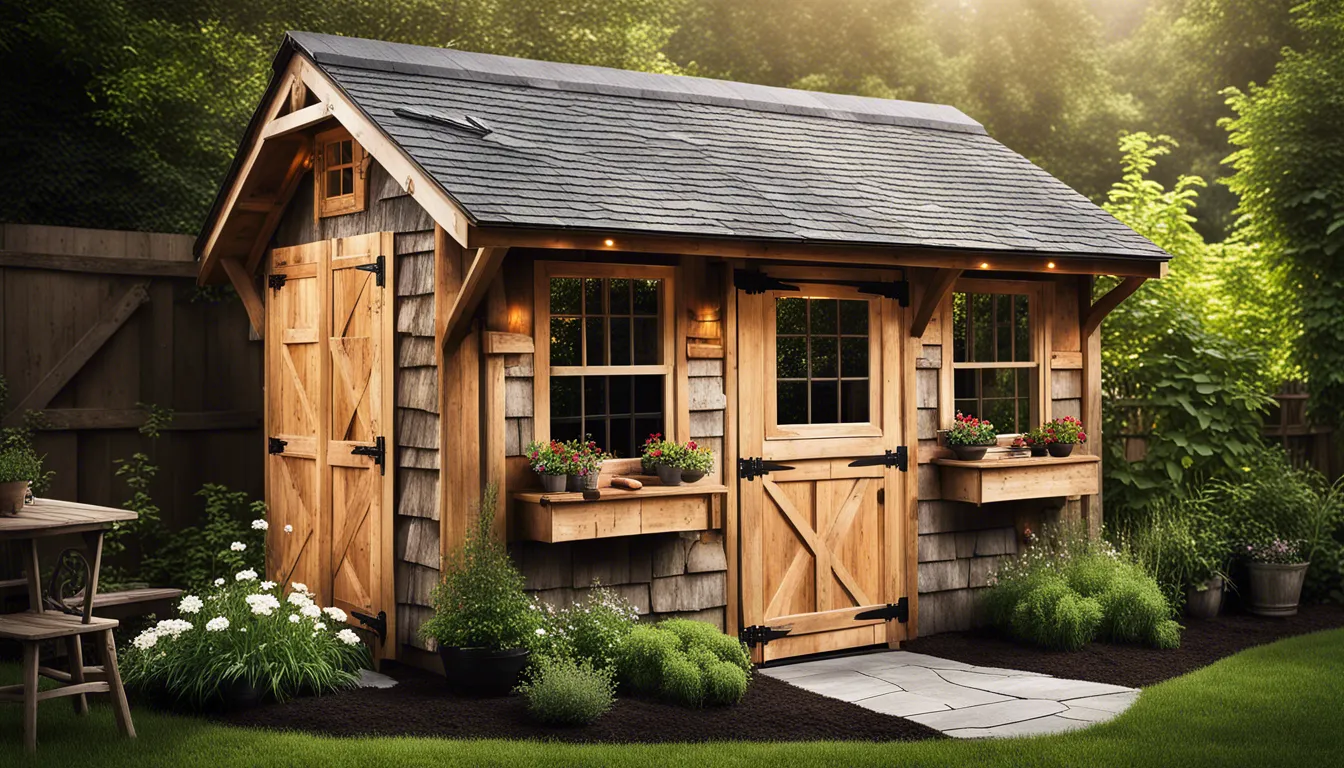
There’s something magical about a timber-frame garden shed. While your neighbors might be putting up cookie-cutter metal storage units, you could be building something that looks like it was plucked from an 18th-century countryside.
This 8×10 timber-frame garden shed plans help you create exactly that – a structure that’s not just practical, but has character in every beam.
GRAB 5 FREE SHED PLANS NOW!
The Beauty of Timber-Frame Construction

Forget flimsy walls and wobbly doors.
Timber-framing is the art of building with substantial posts and beams, each piece working in harmony through carefully carved joints.
From the outside, your shed will look handsomely traditional, but step inside and you’ll feel like you’ve entered a rustic workshop where craftsmen might have shaped wood centuries ago.
The rough-sawn timbers tell their own story, each grain and mark adding to the shed’s personality.
A Design That Works As Hard As You Do
We’ve taken traditional timber-framing methods and simplified them without losing their essence.
The joints are straightforward to cut, even if you’re new to woodworking.
But what really makes this garden shed special is how it welcomes natural light.
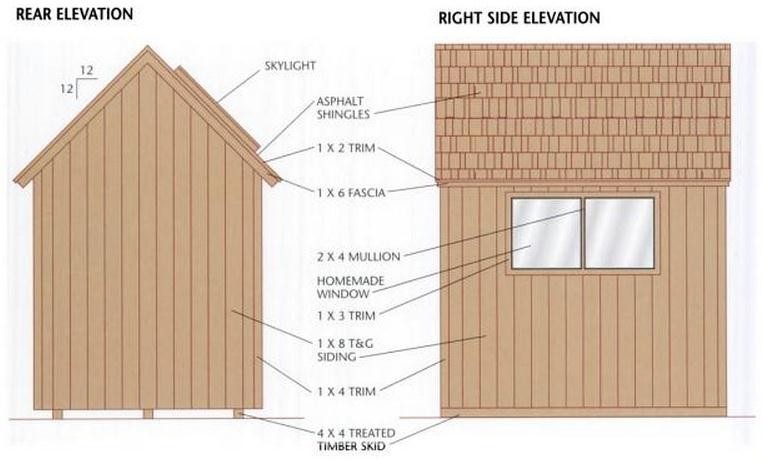
A custom skylight bathes your workspace in sunshine, while a generous side window ensures you’ll never have to fumble in the dark for your garden tools.
Want to make the space even more comfortable?
Consider adding operational windows that catch the breeze, or install roof vents to keep the air flowing on those hot summer days.
Your shed should work with nature, not against it.
Building With Purpose

The roof frame gives you options to match your style and budget.
While standard 2x4s will do the job perfectly well, you might choose to upgrade to rough-cut 2x4s or 4x4s for that extra touch of authenticity.
It’s these little decisions that make a project personally yours.
Our detailed plans walk you through every step, from laying the foundation to fitting the final trim.
You’ll find complete materials lists, clear instructions, and the kind of practical tips that only come from real building experience.
We’ve even included alternative ideas for customizing the design to your needs – because no two gardeners work exactly the same way.
More Than Just Storage
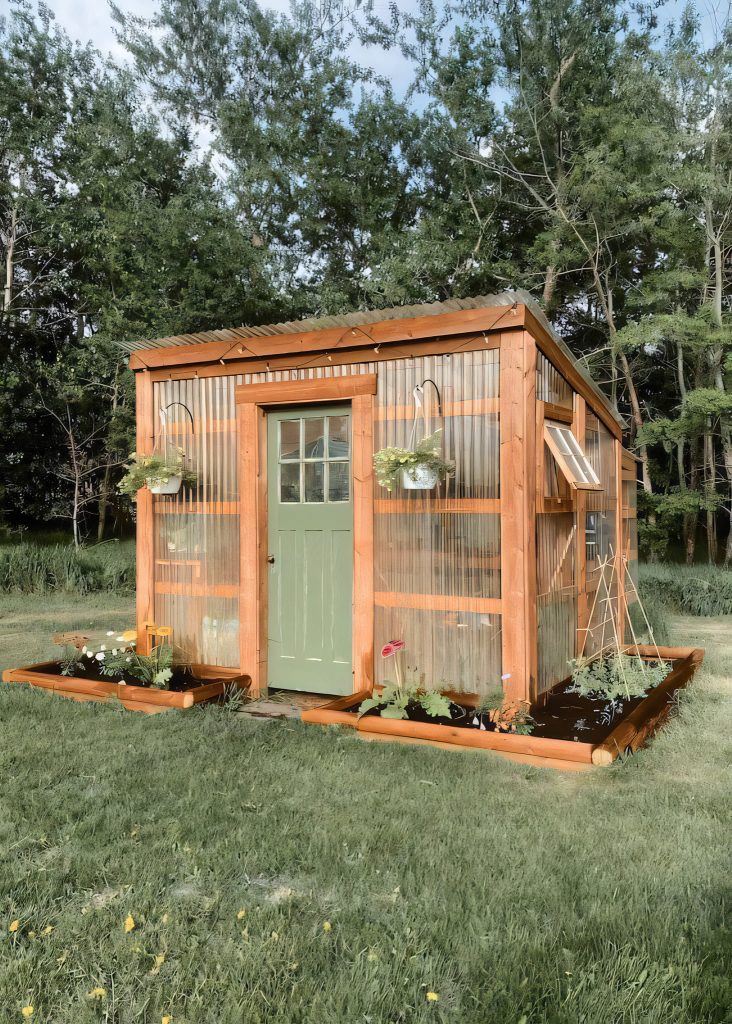
Think of this shed as your garden’s companion.
It’s a workspace where you can pot plants on a rainy day, a quiet spot to plan next season’s garden, or even a retreat where you can simply enjoy the view of your backyard through that generous window.
The timber-frame construction means your shed will stand strong for decades, aging gracefully like the gardens it serves.
Each year, the wood will develop more character, the timber joints will prove their worth through every season, and you’ll have the satisfaction of knowing you built something real, something lasting.
Ready to Build?

Our garden shed plans include everything you need to get started, from the ground up.
We’ll guide you through material selection, show you how to tackle those timber joints, and help you create a structure that’s both beautiful and practical.
No previous timber-framing experience?
Don’t worry. We’ve broken down complex techniques into manageable steps that make sense for today’s DIY builder.
Okay, without further ado, here is the list of materials you will need to build this garden shed:
List of materials
| Materials | ||
|---|---|---|
| Description | Quantity/Size | Material |
| Foundation | ||
| Drainage material | 25 cu. ft. | Compactible gravel |
| Skids | 3 @ 10′-0″ | 4 × 4 treated timbers |
| Floor Framing | ||
| Rim joists | 2 @ 10′-0″ | 2 × 6 pressure-treated |
| Joists | 9 @ 8′-0″ | 2 × 6 pressure-treated |
| Joist clip angles | 18 | 3 × 3 × 3″ × 18-gauge galvanized |
| Floor sheathing | 3 sheets 4 × 8′ | 3/4″tongue-&-groove ext.-grade plywood |
| Wall Framing | ||
| Posts | 6 @ 8′-0″ | 4 × 4 rough-sawn cedar |
| Window posts | 2 @ 4′-0″ | 4 × 4 rough-sawn cedar |
| Girts | 2 @ 10′-0″, 2 @ 8′-0″ | 4 × 4 rough-sawn cedar |
| Beams | 2 @ 10′-0”, 2 @ 8′-0″ | 4 × 6 rough-sawn cedar |
| Braces | 8 @ 2′-0″ | 4 × 4 rough-sawn cedar |
| Post bases | 6, with nails | Simpson BC40 |
| Post-beam connectors | 8 pieces, with nails | Simpson LCE |
| L-connectors | 4, with nails | Simpson A34 |
| Roof Framing | ||
| Rafters | 12 @ 7′-0” | 2 × 4 |
| Collar ties | 1 @ 10′-0″ | 2 × 4 |
| Ridge board | 1 @ 10′-0″ | 2 × 6 |
| Metal anchors- rafters | 8, with nails | Simpson H1 |
| Gable-end blocking | 4 @ 7′-0” | 2 × 2 |
| Exterior Finishes | ||
| Siding | 2 @ 14′-0″, 8@ 12′-0″, | 1 × 8 T&G V-joint rough-sawn cedar |
| 10 @ 10′-0″, 29 @ 9′- | ||
| 0″ | ||
| Corner trim | 8 @ 9′-0″ | 1 × 4 rough-sawn cedar |
| Fascia | 4 @ 7′-0”, 2 @ 12′-0″ | 1 × 6 rough-sawn cedar |
| Fascia trim | 4 @ 7′-0”, 2 @ 12′-0″ | 1 × 2 rough-sawn cedar |
| Subfascia | 2 @ 12′-0″ | 1 × 4 pine |
| Plywood soffits | 1 sheet 4 × 8′ | 3/4″ cedar or fir plywood |
| Soffit vents | 4 @ 4 × 12″ | Louver with bug screen |
| Flashing (door) | 4 linear ft. | Galvanized—18 gauge |
| Roofing | ||
| Roof sheathing | 6 sheets 4 × 8′ | 1/2″ ext.-grade plywood |
| Asphalt shingles | 1.7 squares | 250# per square (min.) |
| 15# building paper | 140 sq. ft. | |
| Metal drip edge | 2 @ 12′-0″, 4 @ 7′-0” | Galvanized metal |
| Roof vents (optional) | 2 units | |
| Roofing cement | 1 tube | |
| Skylight | ||
| Frame | 1 @ 12′-0″ | 2 × 8 |
| Glazing tape | 24 linear ft. | |
| Stops | 1 @ 12′-0″ | 1 × 2 clear redwood |
| Glass | 1 piece—field measure | 5/16′ tempered, clear (Optional:1/4″ plexiglass, clear) |
| Flashing | 14 linear ft. | Prefinished metal- 24 gauge |
| Window | ||
| Frame | 4 @ 6′-0″ | 3/4 × 4 1/4″ (actual) S4S cedar |
| Mullion | 1 @ 4′-0″ | 2 × 4 S4S cedar |
| Stops | 8 @ 6′-0″ | 1 × 2 S4S cedar |
| Glazing tape | 44 linear ft. | Glazing tape |
| Glass | 2 pieces-field measure | 1/4″ tempered, clear |
| Trim | 4 @ 6′-0″, 4 @ 4′-0″ | 1 × 3 rough-sawn cedar |
| Door | ||
| Frame | 2 @ 7′-0”, 1 @ 4′-0″ | 3/4 × 4 1/4″ (actual) S4S cedar |
| Stops | 2 @ 7′-0″”, 1 @ 4′-0″ | 1 × 2 S4S cedar |
| Panel material | 7 @ 7′-0″ | 1 × 6 T&G V-joint rough-sawn cedar |
| Z-brace | 2 @ 6′-0″, 1 @ 8′-0″ | 1 × 6 rough-sawn cedar |
| Strap hinges | 3 | |
| Trim | 5 @ 7′-0′ | 1 × 3 rough-sawn cedar |
| Fasteners | ||
| 60d common nails | 16 nails | |
| 20d common nails | 32 nails | |
| 16d galvanized common nails | 3 1/2 lbs. | |
| 10d common nails | 1 lb. | |
| 10d galvanized casing nails | 1/2 lb. | |
| 8d galvanized box nails | 1 1/2 lbs. | |
| 8d galvanized finish nails | 7 lbs. | |
| 8d box nails | 1/4 lb. | |
| 6d galvanized finish nails | 40 nails | |
| 3d galvanized finish nails | 50 nails | |
| 1 1/2″ joist hanger nails | 72 nails | |
| 2 1/2″ deck screws | 25 screws | |
| 1 1/2″ wood screws | 50 screws | |
| 7/8″ galvanized roofing nails | 2 lbs. | |
| 3/8″ × 6″lag screws | 16 screws | |
| Silicone- latex caulk | 2 tubes | |
| Construction adhesive | 4 tubes |
GRAB 5 FREE SHED PLANS NOW!


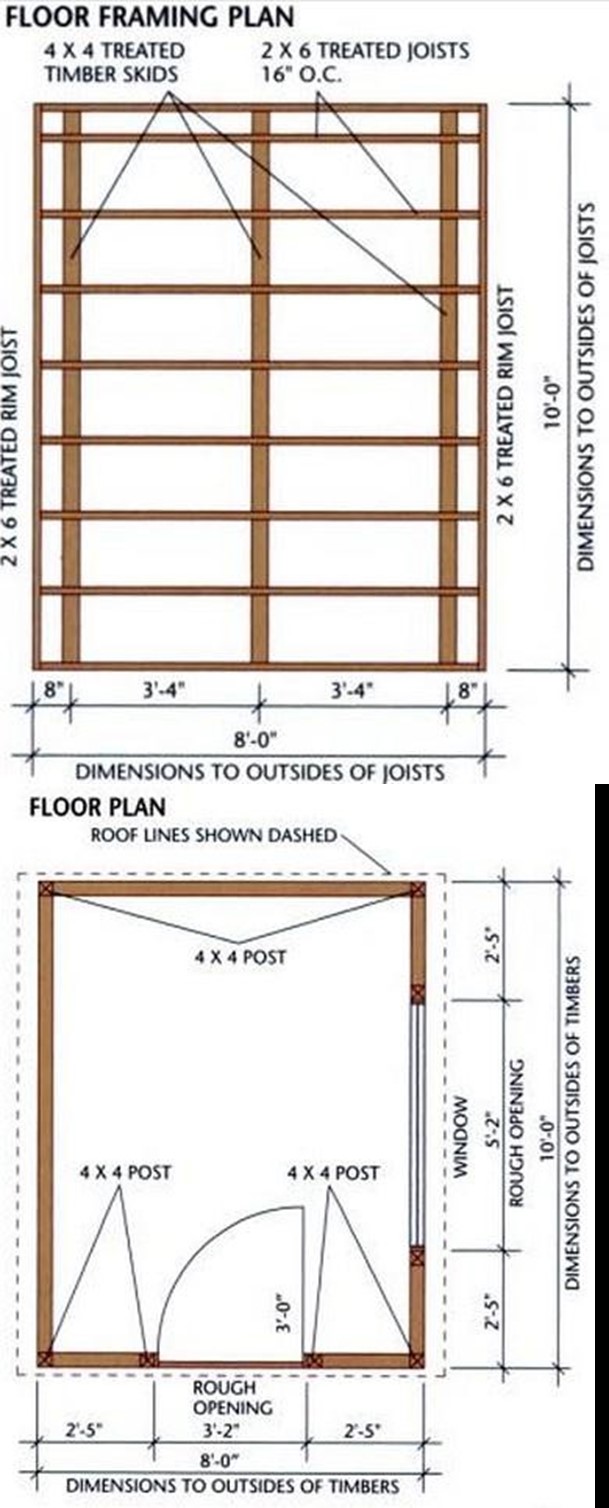


Building the Timber-Frame Garden Shed: Foundation & Floor Frame Guide
Required materials:
- 4″ compactible gravel
- 4×4 treated timber skids (3 pieces @ 120″)
- 2×6 rim joists (2 pieces @ 120″)
- 2×6 floor joists (9 pieces @ 93″)
- Joist clip angles
- Tongue-and-groove floor sheathing
- 16d galvanized common nails
- 8d galvanized box nails
- 1½” joist hanger nails

Step-by-Step Instructions
Step 1: Prepare the Site
- Clear and excavate the building area
- Add 4″ of compactible gravel
- Tamp the gravel thoroughly until level
Step 2: Install Foundation Skids
- Cut three 4×4 treated timber skids to 120″ length
- Place skids on gravel bed according to floor framing plan
- Level all skids carefully
Step 3: Build Floor Frame
- Cut two rim joists to 120″ length
- Cut nine floor joists to 93″ length
- Mark joist layout on rim joists per plan
- Assemble frame using 16d galvanized common nails
- Important: Install joists with crowned edge facing up
Step 4: Secure Floor Frame
- Place floor frame on skids
- Check frame is square by measuring diagonals
- Install joist clip angles along outer skids using 1½” joist hanger nails
- Toenail each joist to center skid with 16d galvanized nails
Step 5: Install Floor Sheathing
- Begin with full sheet at one corner
- Secure with 8d galvanized box nails:
- Every 6″ along edges
- Every 12″ in field areas

Secure the floor frame to the foundation skids with angles (outside skids) and toenails (center skid).

Start the notches with a series of saw cuts, then remove the material with a sharp wood chisel.
Cutting and Notching Posts for Timber-Frame Shed
Required materials:
- Six 4×4 posts
- Circular saw
- Sharp chisel
- Square
- Measuring tape
- Pencil/marker
Step-by-step instructions:
Step 1: Cut Posts to Length
- Cut six 4×4 posts to 90½” each
- Ensure all ends are perfectly square
Step 2: Mark Post Notches
For Corner Posts (4 pieces):
- Mark notches on two adjacent sides of each post
- Notch dimensions: 3½” long x 1½” deep
- Mark bottom of notches at 46¼” from post bottom
- Note: Notches will overlap by 1½”
- Use square to mark complete notch outline
For Door-Frame Posts (2 pieces):
- Mark one girt notch: 3½” long x 1½” deep
- Position at 46¼” from bottom
- Mark one header notch: 3½” long x 1½” deep
- Position at 82″ from bottom
Step 3: Cut Notches
- Set circular saw depth to exactly 1½”
- For each notch:
- Make top cut at mark
- Make bottom cut at mark
- Make several cuts between to remove material
- Clean notch with sharp chisel
- Test fit using 4×4 end piece – ensure snug fit
Step 4: Complete All Notches
- Repeat cutting process for all marked notches
- Test-fit each notch
- Make adjustments if needed for snug fit
Installing Posts for Timber-Frame Shed
Required materials:
- Post bases
- 16d galvanized common nails
- Temporary cross-braces
- Level
- Scrap piece of post
- Hammer
Step-by-step instructions:
Step 1: Position Corner Post Bases
- Use scrap post piece to align post bases
- Place bases flush with floor’s outside edges
- Secure bases to floor using 16d galvanized common nails
Step 2: Position Door Post Bases
- Measure 29″ from floor sides to mark door post locations
- Place bases so posts’ inside faces will align with 29″ marks
- Secure bases with 16d galvanized common nails
Step 3: Install Posts
For Each Post:
- Place post into its base
- Insert one 16d galvanized nail to temporarily secure
- Attach temporary cross-braces to post
- Check post with level to ensure it’s perfectly plumb
- Secure cross-braces once post is plumb
- Complete installation with remaining recommended nails

Anchor the six posts to the floor with metal post bases. Use galvanized nails to fasten the bases and posts.

Join the beams with half-lap joints (inset). Fasten the braces to the posts and beams with lag screws.
Installing Beams and Braces for Timber-Frame Shed
Required materials:
- 4×6 beams (two @ 120″, two @ 96″)
- 4×4 corner braces (eight pieces @ 20″)
- 16d nails
- 60d common nails
- 3/8″ x 6″ lag screws
- Post-beam connectors
- L-connectors
- Bar clamps
- Circular saw
- Handsaw or power miter saw
- Drill
- Chisel
Step-by-step instructions
Step 1: Cut Main Beams
- Cut 4×6 beams to size:
- Two pieces at 120″ length
- Two pieces at 96″ length
Step 2: Create Half-Lap Joints
- Measure beam dimensions:
- Width: 4″ nominal
- Depth: 6″ nominal
- Mark notches equal to:
- Width x ½ depth
- Follow framing elevations for notch orientation
- Cut notches:
- Start with circular saw
- Complete with handsaw
- Smooth using chisel
- Test-fit assembled beams on ground
Step 3: Install Front and Rear Beams
- Place 96″ beam on front wall posts
- Secure temporarily with one 16d nail at each end
- Check wall frame squareness by measuring diagonals
- Install permanently:
- Drill pilot holes
- Drive two 60d common nails through each notch into post
- Repeat process for rear wall using second 96″ beam
Step 4: Install Side Beams and Connectors
- Place 120″ beams on top of short beams
- Verify side walls are square
- Secure each half-lap joint with two 60d nails
- Install connectors:
- Post-beam connectors on outside of corners and both sides of door posts
- L-connectors on inside of each corner
- Use recommended nails for all connectors
Step 5: Prepare Corner Braces
- Cut eight 4×4 braces to 20″ length
- Miter ends at 45° angles
Step 6: Install Corner Braces
- Position each brace at corner
- Ensure ends are flush with post and beam sides
- Secure temporarily with bar clamp
- Install permanently:
- Drill counterbored pilot hole 4½” from each end
- Fasten with 3/8″ x 6″ lag screws
Installing Girts and Door Header for Timber-Frame Shed
Required materials:
- 4×4 girts
- 4×4 door header
- 20d nails
- Construction adhesive
- Circular saw
- Drill
- Window rough opening posts
Step-by-step instructions:
Step 1: Prepare Girts
- Cut 4×4 girts to fit between posts
- Measure carefully for precise fit
Step 2: Create Corner Notches
- For rear-wall girt:
- Notch both ends
- Size: 1½” wide x 1½” deep
- For front-wall girts:
- Notch outside ends only
- Size: 1½” wide x 1½” deep
- Use circular saw for all notch cuts
Step 3: Install Girts
- Test-fit girts in post notches
- Apply construction adhesive to notches
- Set girts in place
- Secure each girt:
- Drill pilot holes
- Drive two 20d nails through outside of posts
Step 4: Install Door Header and Window Frame
- Cut 4×4 door header
- Notch ends like girts
- Install using same method as girts
- For window opening:
- Cut posts to size
- Position according to floor plan
- Secure with 20d toenails

Notch one girt end for each corner joint. Secure the girts to the posts with adhesive and 20d nails (inset).

Install blocks between the two middle rafters, then build the skylight frame from notched 2 × 8s.
Roof Framing Guide with Skylight Installation
Required materials:
- 2×6 rafters (12 pieces)
- 2×6 ridge board (120″)
- 2×4 collar ties (2 @ 58″)
- 2x2s (4 pieces for gable overhang)
- Metal rafter anchors
- 2×4 blocks for skylight frame
- Skylight frame stock
- 10d common nails
- 16d nails
- 2×6 spacer block
- Router or table saw
Step-by-step instructions:
Step 1: Prepare Rafters
- Cut two pattern rafters using rafter template
- Test-fit with 2×6 spacer block as ridge board
- Cut remaining ten rafters to match pattern
Step 2: Prepare Ridge Board
- Cut 2×6 ridge board to 120″
- Mark rafter layout on beams and ridge board:
- Use 24″ on-center spacing
Step 3: Install Rafters
- Mount all rafters according to layout marks
- Install metal anchors on all rafters except outer four
- Use recommended nails for anchors
Step 4: Install Collar Ties
- Cut two 2×4 collar ties to 58″
- Miter ends at 45°
- Position on middle rafters:
- Ensure ties are level
- Keep ends ½” from rafter tops
- Secure each end with three 10d common nails
Step 5: Add Gable Overhang
- Cut four 2x2s to length (peak to rafter ends)
- Install flush with rafter top edges
- Secure with 10d nails
Step 6: Build Skylight Frame Base
- Mark inside faces of middle rafters:
- Measure 16″ from one end
- Measure 64″ from same end
- Cut two 2×4 blocks to fit between rafters
- Install blocks:
- Align with marks
- Keep edges flush with rafters
- Secure with two 16d nails at each end
- Final spacing should be 48″ apart
Step 7: Create Skylight Frame
- Prepare frame stock:
- Cut ¾” wide x ½” deep continuous notch in top corner edge
- Cut frame pieces:
- Miter ends at 45°
- Position flush with rafter bottom edges
- Secure with 10d nails
Step 8: Prepare for Skylight Installation
- Measure frame notch dimensions
- Order materials:
- Skylight glass to fit measurements
- Metal flashing for frame
Installing Siding on Gable Ends
Required materials:
- 1×8 tongue-and-groove siding
- 8d galvanized finish nails
- Measuring tape
- Saw
Step-by-step instructions:
Step 1: Position First Boards
- Start at corners
- Leave ¾” gap below floor frame
- Extend up to 2×2 blocking on end rafters
Step 2: Secure Siding
- Use 8d galvanized finish nails
- Work from corners toward center
- Maintain consistent spacing
Step 3: Door Area Treatment
- Cut boards flush with door frame interior
- Important: Do not nail siding to door header
- Leave door header area free for later steps

Add the siding to the end walls, fastening it to the rafters and timber framing with two facenails at each support.

Install the subfascia along the eaves, then add the fascia and 1 × 2 trim along the top fascia edges.
Installing Fascia, Soffits, and Wall Siding
Required materials:
- 1×4 subfascia
- 1×6 fascia
- 1×2 trim
- 3/8″ plywood soffit panels
- 8d box nails
- 8d galvanized finish nails
- 3d galvanized box nails
- Four soffit vents
- Wall siding
- Saw
Step-by-step instructions:
Step 1: Install Subfascia
- Cut 1×4 subfascia to length
- Position along eaves:
- Align ends flush with outside of end rafters
- Keep top edges flush with top rafter edges
- Secure with 8d box nails
Step 2: Attach Fascia and Trim
- Install 1×6 fascia and 1×2 trim:
- Start with gable overhangs
- Then work along eaves
- Position fascia ½” above rafters for sheathing alignment
- Secure with 8d galvanized finish nails
Step 3: Install Soffit Panels
- Cut 3/8″ plywood panels to fit:
- Measure space between wall framing and fascia
- Refer to eave detail for proper fit
- Secure to rafters using 3d galvanized box nails
Step 4: Add Ventilation
- Cut holes for soffit vents:
- Two outer rafter bays on each side
- Total of four vent locations
- Install vent fixtures
Step 5: Complete Wall Siding
- Install siding along side walls
- Important: Do not nail siding to window header
Installing Roofing
Required materials:
- 1/2″ plywood sheathing
- 8d box nails
- Drip edge
- 15# building paper
- Asphalt shingles
- Pre-formed flashing
- Roofing nails
- Roofing cement
- Roof vents (optional)
Step-by-step instructions:
Step 1: Install Plywood Sheathing
- Start at a lower corner of the roof.
- Secure 1/2″ plywood sheathing with 8d box nails:
- Place nails every 6″ along the edges.
- Nail every 12″ within the sheet’s field.
Step 2: Attach Drip Edge and Building Paper
- Attach drip edge along eaves.
- Apply 15# building paper over the sheathing.
- Add drip edge along gable ends, placing it on top of the paper.
Step 3: Install Asphalt Shingles
- Install shingles up to the bottom edge of the skylight frame.
Step 4: Add Skylight Frame Flashing
- Install pre-formed flashing around the skylight frame:
- Cut the bottom piece 8″ longer than the frame width.
- Snip and bend horizontal flanges to lie flat against frame sides.
- Place the bottom piece over the shingles.
- Drive one roofing nail through each vertical flange at both ends into the frame.
- Install side flashing pieces, then the top piece.
- Seal all joints and nail heads with roofing cement.
Step 5: Install Remaining Shingles
- Install the rest of the shingles.
- Optionally, install roof vents if desired.

Cut the horizontal flanges of the bottom piece of skylight flashing and wrap the ends around the frame sides.

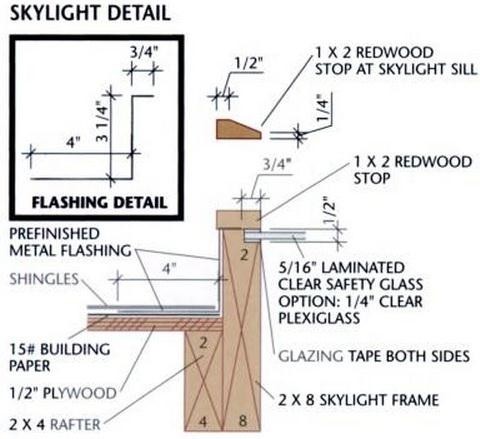
Lay the glass into the skylight frame and secure it with redwood stops. Use a beveled stop for the bottom piece.
Completing the Skylight
Required materials:
- Glazing tape
- Glass pane
- 1×2 stop material (26″ long)
- Table saw, circular saw, or hand plane
- 6d galvanized finish nails
- Caulk
Step-by-step instructions:
Step 1: Apply Glazing Tape
- Place glazing tape on the notches of the skylight frame.
- Set the glass over the tape.
- Apply another layer of glazing tape along the edges of the glass.
Step 2: Prepare Tapered Stop Material
- Taper one side of a 26″ piece of 1×2 stop material, using a table saw, circular saw, or hand plane, as shown in the Skylight Detail.
Step 3: Attach Stops Around the Frame
- Cut the stops to fit around the frame.
- Use the tapered stop for the bottom (sill) piece.
- Drill pilot holes and secure the stops with 6d galvanized finish nails.
Step 4: Seal with Caulk
- Caulk all nail holes and along the edges of the stops.
Installing the Window
Required materials:
- 3/4″ × 4 1/4″ stock for window frame
- 2 1/2″ deck screws
- 2 × 4 mullion
- Shims
- Level
- 10d galvanized casing nails
- 1 × 2 stop material (sixteen pieces)
- Glass pane
- Glazing tape
- 6d galvanized finish nails

Step-by-step instructions:
Step 1: Assemble the Window Frame
- Cut the 3/4″ × 4 1/4″ stock to create a rectangular frame, making it 1/2″ shorter and narrower than the rough opening.
- Join the frame pieces with 2 1/2″ deck screws.
- Add a 2 × 4 mullion in the center of the frame.
Step 2: Install the Window Frame
- Position the window frame in the rough opening.
- Use shims and a level to ensure the frame is plumb, level, and the jambs are straight.
- Secure the frame with 10d galvanized casing nails.
Step 3: Prepare and Attach Stops
- Cut sixteen 1 × 2 stops, beveling the two outer sill stops as shown in the Window Jamb Detail.
- Attach the inner stops with 6d galvanized finish nails.
- Order glass to fit the frame.
Step 4: Install Glass and Outer Stops
- Place the glass in the frame.
- Attach the outer stops, applying glazing tape to both sides of the glass for a secure fit.

Attach the outer window stops, with the beveled stop at the bottom. Nail the center stops to the mullion.
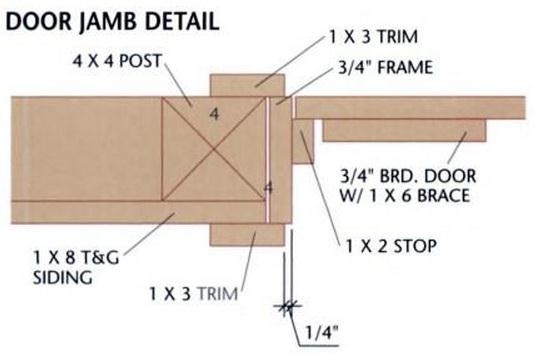
Use shims to set the gaps along the door edges, and mount the door hinges with galvanized screws.
Building the Door and Installing Trim
Required materials:
- 1×6 siding (seven pieces, cut to 80 3/4″)
- 1×2 stop material
- 1×3 door and window trim
- 1×4 corner trim
- 2 1/2″ deck screws
- 10d galvanized casing nails
- Shims
- Flashing
- Construction adhesive
- 1 1/4″ wood screws
- Hinges
Step-by-step instructions:
Step 1: Build the Door Frame
- Cut head jamb to 37 5/8″ and two side jambs to 80 7/8″.
- Position the head jamb over the side jamb ends; fasten with 2 1/2″ deck screws.
- Cut 1×2 stops and install them 3/4″ from the inside frame edges (for an outward swing, install 3/4″ from outside edges).
Step 2: Install the Door Frame
- Position the frame in the rough opening, using shims to ensure it’s square and plumb.
- Secure with 10d galvanized casing nails.
Step 3: Prepare Door Boards
- Cut seven 1×6 siding pieces to 80 3/4″.
- Arrange boards with ends flush; mark and trim end boards so the total width is 36″.
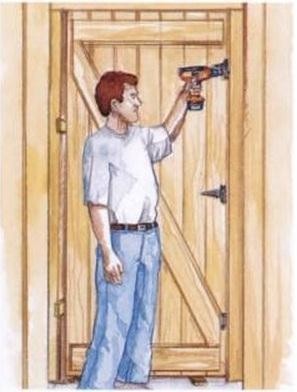
Step 4: Add Z-Brace and Hinges
- Cut Z-brace boards per Door Detail and lay them on a flat surface.
- Attach brace boards using construction adhesive and 1 1/4″ wood screws.
- Install the bottom hinge before the cross brace, then add remaining hinges and hang the door.
Step 5: Install Flashing and Trim
- Install flashing above the door.
- Nail off the siding, then install 1×3 door trim, 1×3 window trim, and 1×4 corner trim.

Conclusion
If you’re excited about this plan, you’ll love what’s waiting in Ryan Henderson’s MyShedPlans!
Imagine having 12,000 expertly crafted shed plans right at your fingertips, making every project faster, simpler, and stress-free. From beginner to advanced designs, MyShedPlans has everything you need to turn your building dreams into reality.
Transform your backyard and building skills today with 12,000 Shed Plans — download now and let’s get started!