Let’s talk about how to build a wilderness shelter for survival.
Picture yourself deep in the wilderness as the sun dips below the horizon.
The temperature plummets, and the wind bites.
In moments like this, a well-built shelter can mean the difference between safety and serious danger.
A sturdy shelter shields you from harsh weather; be it rain, snow, or scorching sun. It guards against biting winds and bone-chilling cold while providing a psychological anchor, offering much-needed comfort and security.
This guide walks you through the essentials: selecting the ideal location, sourcing materials effectively, and tailoring your shelter to match the environment.
Let’s dive in and equip you with the skills to thrive, no matter where the wild takes you.
Previously Classified Military Info Reveals:
Even With ZERO Tools & Resources Available!
How to Build a Wilderness Shelter Quick Guide
- To build a wilderness shelter, start by selecting a safe location, avoiding hazards like falling branches (widowmakers), strong winds, and flood-prone areas while staying close to water and natural resources.
- Gather essential materials, including a tarp for cover, paracord for securing the frame, and insulation like leaves and pine boughs for warmth.
- Construct a sturdy framework using branches, creating a lean-to or A-frame structure with a ridgeline for support.
- Cover the shelter with your tarp or natural materials, overlapping layers to waterproof it, and insulate the walls and floor to retain heat.
- Finally, test the shelter for stability, leaks, and comfort, reinforcing weak spots and ensuring proper ventilation for a safe and effective refuge.
How to Build a Wilderness Shelter: Step-by-Step Guide
In survival situations, a well-constructed shelter serves as your first line of defense against the elements. It conserves energy, provides psychological relief, and ensures your safety.
Here are 5 steps to help you build a wildnerness shelter that meets your needs:
Step 1: Choose the Right Location
Your shelter’s location is the foundation of your survival.
Picking the wrong spot can expose you to falling debris, flooding, or freezing winds.
Take your time scouting for a safe and practical location, as this step is critical.
- Avoid Widowmakers: Before settling on a site, look up. Check the surrounding trees for dead branches, partially fallen limbs, or leaning trees that could crash down. Wind, snow, or even vibrations from your movements can dislodge them. If you see any sign of instability, move to a safer area. Safety always comes first.
- Find a Natural Windbreak: Look for large boulders, dense bushes, or hills that naturally block the wind. Position your shelter so that the wind blows past it rather than into it. This will help retain warmth and prevent your shelter from collapsing during strong gusts. Observe the direction the trees are leaning; they often reveal the prevailing wind direction.
- Maintain a Safe Distance from Water: While proximity to water is convenient for drinking and cooking, building too close can lead to problems like flooding or damp ground. Aim for higher ground within about 60 yards of a water source. Look for signs of past flooding, such as debris caught in trees or waterlines along rocks, and avoid those areas.
- Choose Elevated, Flat Ground: A slight slope is fine, but avoid valleys or depressions where cold air settles. Flat terrain makes sleeping comfortable and helps your shelter remain stable. Clear the ground of rocks, roots, or anything else that could cause discomfort or instability.
- Look for Nearby Materials: A location surrounded by natural resources like fallen branches, leaves, and rocks will save you time and energy. Take a moment to survey the area for firewood, as keeping your fire going may be essential overnight.
Step 2: Gather Essential Materials for a Wilderness Survival Shelter
FREE Light Saver Tactical Torch
Building a shelter isn’t just about finding the right spot.
You also need to collect and prepare a variety of materials to construct and insulate your structure.
Include these materials into your bug-out bag:
- Survival Tarp: If you have a tarp in your gear, it’s a lifesaver. Use it as the primary covering for your shelter. Choose a tarp with grommets so you can easily secure it with paracord or stakes. A tarp offers instant waterproofing and heat retention, especially when combined with reflective layers to bounce warmth back inside. For larger groups, overlap multiple tarps to create a bigger, more stable structure.
- Paracord: This cordage is indispensable. Use it to secure the tarp to trees or to create a ridgeline for your shelter’s frame. Practice basic knots like the bowline or trucker’s hitch before heading into the wild; knowing these can save precious minutes when building your shelter under pressure. Cut paracord into manageable lengths before setting out to save time when assembling your structure.
- Natural Resources: Look for dry branches to serve as your framework, especially thick ones that can bear weight. Use large leaves like palm fronds or pine boughs as natural shingles for the roof. Keep an eye out for dry, fluffy materials like cattail fluff or dried grasses for extra insulation.
- Rocks and Stakes: Collect large, flat stones to weigh down tarps or other coverings, especially in high-wind conditions. If natural stakes aren’t available, carve your own using strong, straight branches. Sharpen one end with your survival knife for easy ground penetration.
- Firewood and Tinder: Gather plenty of dry wood to keep your fire burning throughout the night. Start with small twigs and gradually move to larger logs. Dry bark, birch shavings, or even pocket lint can act as excellent tinder to ignite your fire.
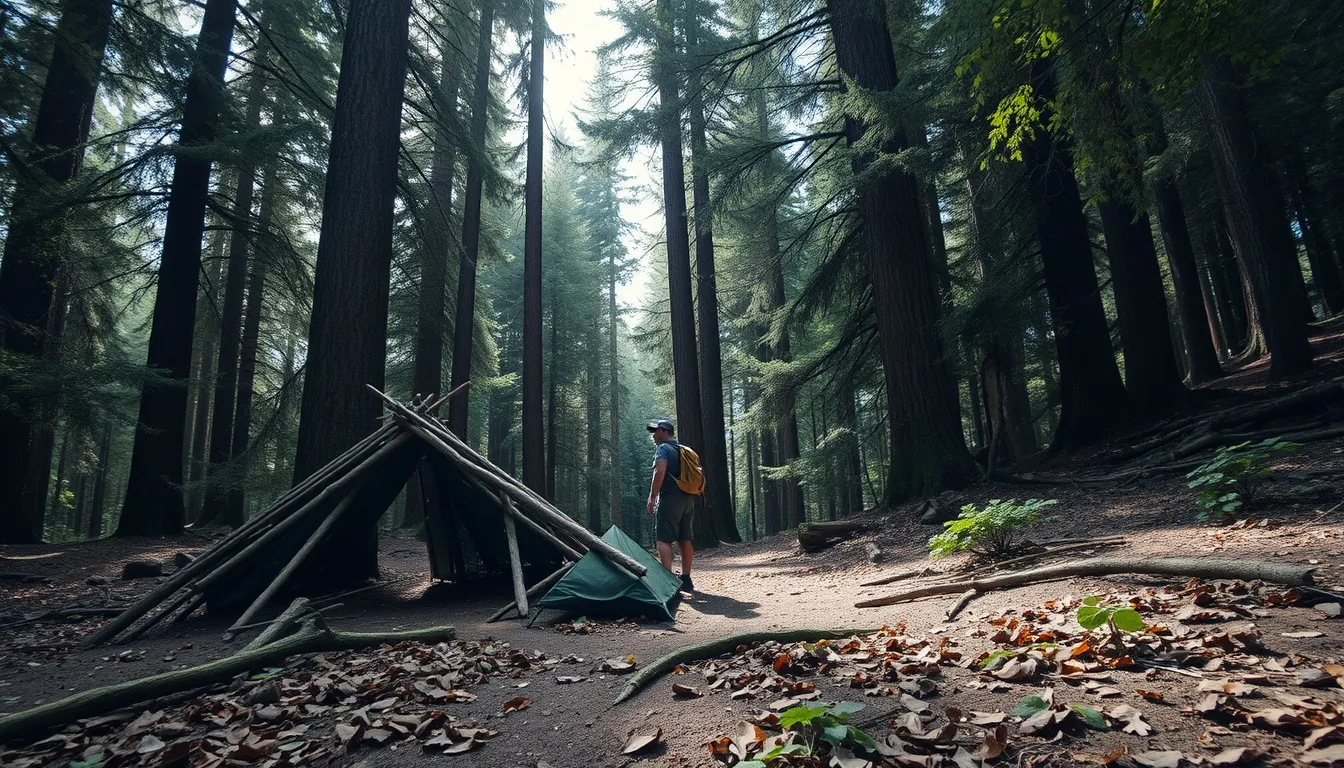
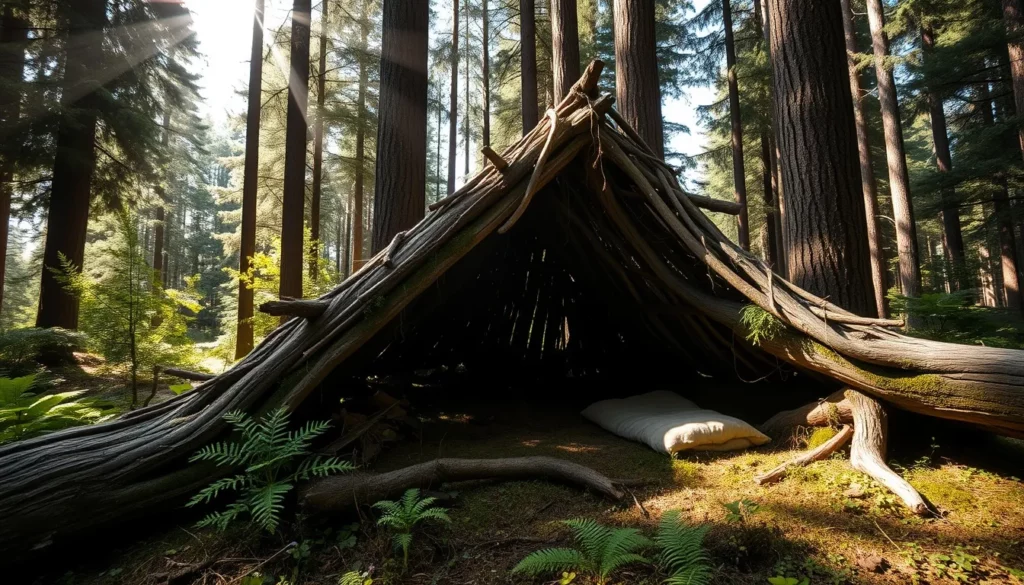
Step 3: Construct the Framework
With your location chosen and materials in hand, it’s time to construct the skeleton of your shelter. This step determines its strength and stability, so build with care and precision.
- Set Up a Ridgeline: If you’re using a tarp, string paracord between two trees to act as the main support. Choose trees roughly 6-8 feet apart, depending on the tarp size. Tie the cord tightly using a trucker’s hitch, making sure it’s taut enough to support weight but not so tight that it snaps under tension.
- Build a Sturdy Frame: For lean-tos, prop a long branch horizontally across two vertical poles and secure them with paracord. For an A-frame, place two long branches in a triangle shape and rest a ridgepole across the top. Use smaller branches to cross-brace the sides, ensuring stability. Test the structure by gently pushing against it—if it wobbles, reinforce the weak spots.
- Create a Ground Barrier: Before adding walls, lay down a thick layer of branches or logs to elevate yourself above the ground. This prevents moisture and cold from seeping into your shelter, especially in wet conditions.
GRAB 5 FREE SHED PLANS NOW!
Step 4: Layer and Insulate
Your framework is only as good as its covering.
Proper insulation not only keeps you dry but also conserves body heat, critical in cold environments.
- Roof Construction: Drape your tarp over the ridgeline, ensuring it covers the entire framework. Weigh down the edges with rocks or tie them to stakes for added security. If you don’t have a tarp, layer large leaves, bark, and moss over the frame, starting from the bottom and working upwards. Overlap each layer like shingles to direct water away from the inside.
- Wall Insulation: Add thick layers of pine boughs, grasses, or debris to the walls. This creates an insulating barrier that traps heat and keeps out cold drafts. The thicker the walls, the warmer your shelter will be.
- Ground Padding: A comfortable, insulated floor is just as important. Use dry leaves, grass, or pine needles to create a soft, warm layer beneath you. Aim for at least six inches of padding to keep cold and dampness at bay.
- Plug Gaps: Use mud, moss, or extra vegetation to seal any holes or openings in your roof and walls. This not only enhances insulation but also keeps out insects and small animals.
Step 5: Test and Refine
Don’t consider your shelter complete until you’ve tested its strength, comfort, and effectiveness. Small adjustments can significantly improve its performance.
- Stability Check: Push against the frame and walls to ensure they hold up. If anything shifts or collapses, reinforce those areas with additional branches or cordage.
- Waterproofing: Simulate rainfall by splashing water on the roof. Watch for leaks and add more layers if necessary. A shelter that keeps you dry is critical for maintaining body heat.
- Comfort Assessment: Lie inside your shelter to evaluate its warmth and space. Adjust the ground padding or widen the interior if you feel cramped. Comfort directly impacts your ability to rest and recover.
- Ventilation: Ensure there’s enough airflow to prevent condensation. Create small openings near the roof or entrance, but keep them angled away from the wind.
Why a Wilderness Survival Shelter Matters
When you’re thrust into the wilderness with no immediate way back, an emergency wilderness survival shelter can mean the difference between life and death.
In extreme conditions, survival experts emphasize the “rule of threes”: you can last three weeks without food and three days without water, but in harsh weather, without shelter, you might only have three hours.
A sturdy wilderness shelter shields you from rain, snow, biting wind, and the blazing sun. It preserves your body heat, giving you a fighting chance to recover energy and maintain physical strength.
Beyond its physical benefits, a shelter also provides a crucial psychological edge and offers a sense of security, keeping panic at bay and boosting morale.
With a safe, dry space to regroup, you can think clearly, strategize your next moves, and await rescue with greater confidence.
Conclusion
In the unpredictable and often unforgiving embrace of nature, your ability to create a safe haven can mean the difference between succumbing to the elements and emerging triumphant.
The techniques outlined in this guide are not merely theoretical exercises, but practical lifelines that transform raw survival knowledge into a tangible shield against environmental challenges.
Every shelter you build is a unique dialogue between you and the landscape around you. It requires careful observation, resourcefulness, and a deep respect for the natural environment.
From selecting the perfect location to meticulously layering materials for insulation, each step is a calculated decision that reflects your understanding of survival principles.
The shelter represents human ingenuity, our capacity to problem-solve under pressure, and our fundamental instinct to protect ourselves.
Remember that wilderness survival is as much a mental challenge as a physical one.
A well-constructed shelter doesn’t just protect your body from harsh conditions; it provides a psychological sanctuary that can restore hope and clarity in seemingly desperate situations.